
XPath is a good place to start. An effective language that is frequently used for web scraping is XPath. It’s one of the languages you can use with Scrapy to extract web data since it lets you choose nodes or compute values from an XML or HTML document. The other is CSS, and although CSS selectors are a well-liked option, XPath really gives you greater flexibility.
With XPath, you may extract data based not only on the page structure but also on the contents of text elements. So, if you are online scraping and come across a difficult-to-scrape website, XPath might just rescue the day (and a ton of time!).
Before moving on to more complicated use cases, this introductory XPath tutorial will take you through the fundamental ideas behind the language that are essential to a thorough grasp of it.
Note: You can use the XPath playground https://scrapinghub.github.io/xpath-playground/?utm_activity=BLO to experiment with XPath. Just paste the HTML samples provided in this post and play with the expressions.
The basics
Consider this HTML document:
<html>

<head>

<title>My page</title>

</head>

<body>

<h2>Welcome to my <a href="#">page</a></h2>

<p>This is the first paragraph.</p>

<!-- this is the end -->

</body>

</html>
Any XML/HTML document is handled as a tree by XPath. The root node of this tree is separate from the document itself. In actuality, it is the parent of the document element node (<html> in case of the HTML above). The HTML document’s XPath tree appears as follows:
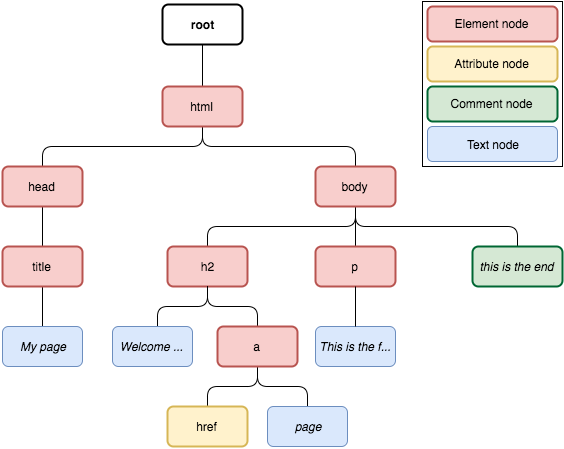
As you can see, an XPath tree has a wide variety of node types:
- Element node: represents an HTML element, a.k.a an HTML tag.
- Attribute node: represents an attribute from an element node, e.g. “href” attribute in
<a href=”http://www.example.com”>example</a>. - Comment node: represents comments in the document (
<!-- … -->). - Text node: represents the text enclosed in an element node (
examplein<p>example</p>).
Understanding how XPath expressions operate requires being able to distinguish between these several categories. Let’s now delve deeper into XPath.
Here is how an XPath expression can be used to choose the title element from the previous page:
/html/head/title
We refer to this as a location path. As when addressing files in a file system, it enables us to define the path from the context node (in this example, the tree’s root), to the element we want to pick. The three location steps in the location path above are separated by slashes. In general, it means to start with the “html” element, look for a “head” element below it, and then look for a “title” element below that “head.” Each step involves a context node update. When evaluating the final step, for instance, the head node serves as the context node.
The whole explicit node-by-node path is typically unknown to us or not important to us; instead, we are just concerned with the nodes that have a specific name. We can choose them utilizing:
//title
This indicates that you should only choose nodes whose names match the title after searching the entire tree beginning at its root (//). In this illustration, the axis is //, and the node test is title.
The expressions we’ve just seen do, in fact, use XPath’s condensed syntax. When we translate /title to its complete syntax, we get:
/descendant-or-self::node()/child::title
In other words, descendant-or-self, or the present node or any node below it in the tree, is what // stands for in the abbreviated syntax. The axis, which is a component of the expression, specifies a group of nodes from which to choose based on their direction on the tree in the present context (downwards, upwards, on the same tree level). We’ll delve deeper into this later. Other instances of axes include parent, child, ancestor, etc.
The node test, which comes after node(), is a section of the expression that comprises an expression that determines whether or not a particular node should be chosen. It chooses nodes from all types in this instance. A second axis, child, which indicates to access the child nodes from the present context, is then followed by a node test that chooses the nodes with the title.
As a result, the axis specifies where in the tree to apply the node test, and the nodes that match the node test will be returned as a result.
Nodes can be tested against either their type or their name.
Examples of name testing are shown below:
Expression Meaning
/html Selects the node named html, which is under the root.
/html/head Selects the node named head, which is under the html node.
//title Selects all the title nodes from the HTML tree.
//h2/a Selects all a nodes that are directly under an h2 node.
here are some examples of node type tests:
Expression Meaning
//comment() Selects only comment nodes.
//node() Selects any kind of node in the tree.
//text() Selects only text nodes, such as “This is the first paragraph”.
//* Selects all nodes, except comment and text nodes.
Name and node tests can both be incorporated into a single phrase. For instance:
//p/text()
With this expression, the text nodes within of p elements are chosen. This would pick “This is the first paragraph” in the HTML snippet above.
Let’s now examine further filtering and specification options. Take a look at this HTML document:
<html>

<body>

<ul>

<li>Quote 1</li>

<li>Quote 2 with <a href="...">link</a></li>

<li>Quote 3 with <a href="...">another link</a></li>

<li><h2>Quote 4 title</h2> ...</li>

</ul>

</body>

</html>
Let’s assume that we just want to choose the first li node from the excerpt above. This is possible with:
//li[position() = 1]
The expression enclosed in square brackets is referred to as a predicate, and it applies the specified condition to the node-set returned by /li (i.e., all li nodes from the document). In this instance, it uses the position() function to determine each node’s position, returning the node’s current position in the final node-set (notice that positions in XPath start at 1, not 0). The phrase above can be shortened to:
//li[1]
The aforementioned element would be chosen by both XPath expressions:
<li class="quote">Quote 1</li>
Here are some further predicate examples:
Expression Meaning
//li[position()%2=0] Selects the li elements at even positions.
//li[a] Selects the li elements that enclose an a element.
//li[a or h2] Selects the li elements that enclose either an a or an h2 element.
//li[ a [ text() = “link” ] ] Selects the li elements that enclose an a element whose text is “link”. Can also be written as //li[ a/text()=”link” ].
//li[last()] Selects the last li element in the document.
In essence, a location path is made up of stages that are separated by /, and each step has the option of having an axis, a node test, and a predicate. This expression consists of two steps, each of which has an axis, a node test, and a predicate:
<span style="font-weight: 400;">//li[ 4 ]/h2[ text() = "Quote 4 title" ]</span>
The same phrase is also presented below using the standard syntax:
/descendant-or-self::node()
/child::li[ position() = 4 ]
/child::h2[ text() = "Quote 4 title" ]
Using the union operator |, we can also merge many XPath expressions into a single one. For instance, the following statement can be used to select every a and h2 in the aforementioned document:
//a | //h2
Now think about the following HTML file:
<html>

<body>

<ul>

<li id="begin"><a href="https://scrapy.org">Scrapy</a></li>

<li><a href="https://scrapinghub.com">Scrapinghub</a></li>

<li><a href="https://blog.scrapinghub.com">Scrapinghub Blog</a></li>

<li id="end"><a href="http://quotes.toscrape.com">Quotes To Scrape</a></li>

</ul>

</body>

</html>
Let’s say we only want to choose the a components whose links lead to HTTPS URLs. By examining their href attribute, we can do it.
//a[starts-with(@href, "https")]
In order to check whether an element’s href property begins with “https,” this expression first picks all of the document’s an elements. By utilizing the syntax @attributename, we may access any node attribute.
Here are a few more instances of characteristics in use:
Expression Meaning
//a[@href=”https://scrapy.org”] Selects the a elements pointing to https://scrapy.org.
//a/@href Selects the value of the href attribute from all the a elements in the document.
//li[@id] Selects only the li elements that have an id attribute.
More on axes
The only axe kinds we’ve seen so far are these two:
- descendant-or-self
- child
We’ll see a few examples, but there are many more where those came from. Take a look at this HTML document:
<html> <body> <p>Intro paragraph</p> <h1>Title #1</h1> <p>A random paragraph #1</p> <h1>Title #2</h1> <p>A random paragraph #2</p> <p>Another one #2</p> A single paragraph, with no markup <div id="footer"><p>Footer text</p></div> </body> </html>
At this point, we only want to take the first paragraph from each title. The following-sibling axis, which chooses all siblings after the context node, can be used to accomplish that. Sibling nodes are those that share the same parent; for instance, the body tag’s whole offspring are siblings. This phrase is used:
//h1/following-sibling::p[1]
Each of the h1 nodes from the page serves as the context node to which the following-sibling axis is applied in this illustration.
What happens if we only want to choose the text that appears before the footer? The preceding-sibling axis might be used:
//div[@id='footer']/preceding-sibling::text()[1]
In this instance, we are choosing the text node that comes first before the div footer (“A single paragraph, with no markup”).
We can choose elements using XPath based on the text included in those elements. With the use of this feature and the parent axis, we can choose the parent of the p element whose text is “Footer text” as follows:
//p[ text()="Footer text" ]/..
The expression above selects <div id=”footer”><p>Footer text</p></div>.You may have noted that we used the shortcut .. here to refer to the parent axis.
We might use the following phrase as an alternative to the one above:
//*[p/text()="Footer text"]
It achieves the same outcome as the preceding statement by choosing only those elements out of all of them that have a p child whose text is “Footer text.”
Additional axes can be found in the XPath standard: https://www.w3.org/TR/xpath/#axes
This essay only serves as a basic introduction to the many strong features of XPath. Check out these resources if you want to learn more:
- https://zvon.org/comp/r/tut-XPath_1.html
- https://www.slideshare.net/scrapinghub/xpath-for-web-scraping
- https://www.zyte.com/blog/xpath-tips-from-the-web-scraping-trenches/