
Have you turned off AMP on your website after receiving a Google Search Console error stating that “Referenced AMP URL is not an AMP”?
AMP, also referred to as Accelerated Mobile Pages, is an open-source web component framework that was developed by Google and may be used to quickly construct user-first webpages, stories, emails, and advertisements.
Fundamentally, it’s a streamlined version of an HTML page made to be really light and load quickly. This website is optimized for mobile devices with a focus on readability and speed. However, as part of a recent statement, Google has decided to no longer require AMP for Top Storie users to be eligible.
In case you plan to opt-out of AMP you’ve to disable the AMP plugin (if using WordPress). But the problem is search engines like Google will still be pointing to your old page with /amp at the end and will land your visitors to 404 - Page Not Found error.
Otherwise, you’ll have a problem like this:

What then should be done to prevent such issues after AMP has been deactivated? Easy!
To prevent this situation, you must correctly redirect such pages after uninstalling AMP.
You’ve come to the correct spot if you’re wanting to redirect an AMP page to a non-AMP one since we’ll be talking about the steps you can take in several major web servers and services to do that. Therefore, let’s begin.
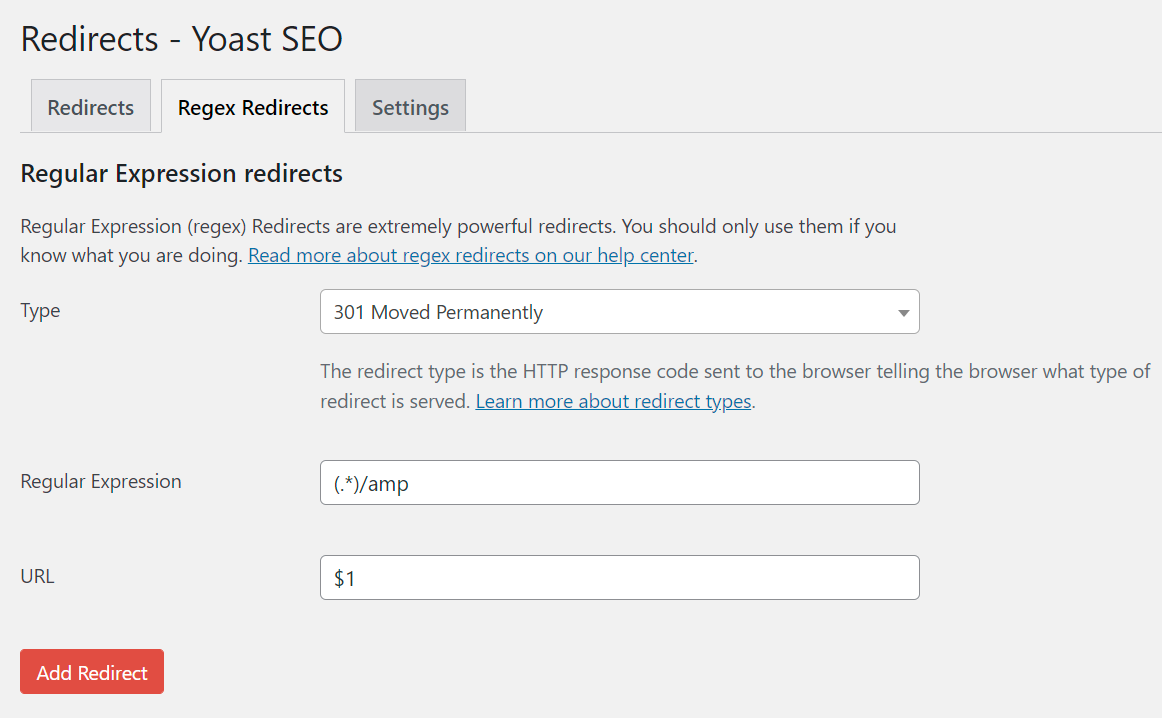
YoastSEO Regex Redirector
Go to /wp-admin/admin.php?page=wpseo_redirects&tab=regex Regular Expression (regex) Redirects are extremely powerful redirects. You should only use them if you know what you are doing.
Write (.*)/amp and $1
.htaccess
You can try this rule on .htaccess file to redirect amp to non-amp:
RewriteCond %{REQUEST_URI} (.+)/amp(.*)$
RewriteRule ^ %1/ [R=301,L]
or
# Redirect from AMP to non-AMP path
RewriteEngine On
RewriteCond %{REQUEST_URI} (.+)/amp(.*)$
RewriteCond %{REQUEST_URI} !^/wp-content/(.*)$
RewriteRule ^ %1/ [R=301,L]

Nginx
Nginx configuration is stored in nginx.conf.
The file should be available in /etc/nginx or /etc/nginx/conf.d on Linux servers (for an open-source version of NGINX, the location may differ like /usr/local/nginx/conf or /usr/local/etc/nginx).
Edit the nginx.conf file where your site’s/domain’s configuration is stored where you need to enable AMP to non-AMP redirection and add below rewrite line in the server { block:
rewrite ^/(.*)\/amp http://example.com/$1 permanent;Replace example.com with your own domain and save the file. Restart nginx server to make the redirection change effective.
$ sudo systemctl restart nginxNow you can verify if redirection is working from your browser.
RankMath SEO Regex Redirector
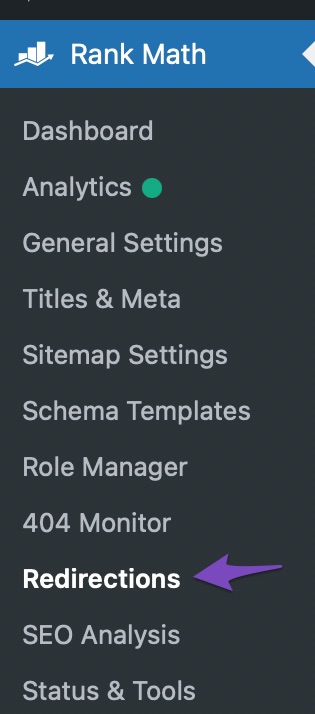
1. Navigate to Redirections: Before you begin, make sure you’ve installed Rank Math and activated the Redirection module from Rank Math > Modules section.
Once you’ve activated the Redirection Module, navigate to Redirections from your Rank Math’s dashboard as shown below:
2. Add a New Redirection: Click on Add New to add a new redirection as shown below:
3. Create a Regex Redirection: To redirect all AMP URLs back to the regular URLs, add your source and destination URLs and select the matching option as Regex from the drop-down list.
Regex Source URL: (.*)/amp
Destination URL: /$1![]()
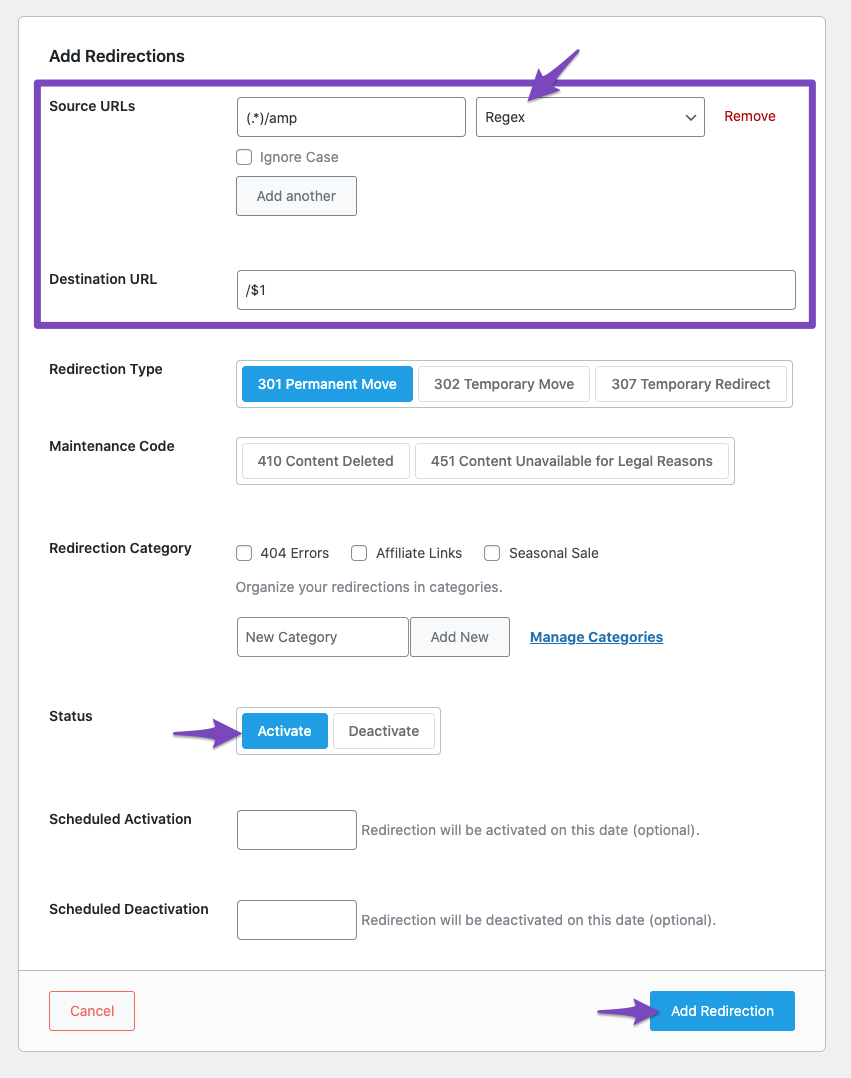
Make sure the redirect is turned on. To add the regex redirect, click Add Redirection. That’s all, then! URLs such as http://yoursite.com/yourpage/amp/ will be redirected to http://yoursite.com/yourpage/ as a result.
On WordPress, disabling AMP is a simple remedy, and using Rank Math makes it even simpler. However, if your website doesn’t use a CMS, you may want to carefully follow the instructions in the official Google documentation for turning off AMP in order to protect both your search traffic and the SEO authority of your website.
Apache
Apache used .htaccess directives. You can edit the .htaccess file in the root of your domain and add the following lines for AMP to the non-AMP redirection:
RewriteEngine On
RewriteCond %{REQUEST_URI} (.+)/amp(.*)$
RewriteRule ^ %1/ [R=301,L]
Save the changes to .htaccess file and verify redirection from your browser.
You may also use the above code for WordPress or another CMS on a shared hosting platform. Consult your hosting company if you have questions about modifying.htaccess.
Cloudflare
Much easier, if you are using Cloudflare. You can take advantage of Rules, which you find on the top icons bar after login.
- You can have a matching URL as below.
https://example.com/*/amp/- Settings as Forwarding URL with 301 and destination URL as below.
https://example.com/$1- Click on Save and Deploy
This is what was done for website.

Wait for few seconds and then try to access the AMP URL and you will notice it is getting redirected to a non-AMP page.
WordPress Redirection Plugin: https://wordpress.org/plugins/redirection/
Alternatively, you can also prevent 404 by doing a redirect from AMP to non-AMP path (canonical) pages using a free plugin called “Redirection“.

- Install a free plugin called “Redirection“
- Go to WordPress Dashboard > Tools > Redirection
- Add a new 301 Redirection
- Keep source
/(.*)\/amp - Target URL
https://www.yourdomain.com/$1
Summary
We’ve covered a brief introduction about AMP and why it has been in use. AMP to non-AMP redirection is an essential step to be done post disabling AMP to avoid losing out on your site visitors due to 404 errors. This can be easily achieved using permanent redirection as mentioned above.